
I came across a picture of a flower today, all was black in white, except the flower itself, which was a bright red. (I'm sure all of you have seen photos edited like this before.)
I always thought pictures like this were cool, so I thought I'd try the trick on some of my LEGO pictures using Paint.Net.
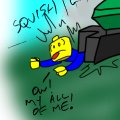
-Wizard-
-Forestman-
Turns out this is a really easy trick. Here are the steps I used:
1 - Open your picture
2 - Create a duplicate layer of the image
3 - Set the top layer to black and white
4 - use the eraser tool to carefull remove the black and white from the desired areas.
I thought it would be a cool way to present some MOCs. One of the things I had in mind was a picture including a LEGO fire, having the flames be the only thing colorful. (And even adding a red or orange glow around it for a nice effect.)
Any thoughts?
~Amanda
Black and White Pictures. (With Color)
Black and White Pictures. (With Color)
[url=http://www.bricklink.com/store.asp?p=Lamanda]Bricks & Customs[/url]
[url=http://www.flickr.com/photos/lamanda2/]My Flickr[/url]
[url=http://www.flickr.com/photos/lamanda2/]My Flickr[/url]
-
wunztwice
- Knight Bannerett
- Posts: 2656
- Joined: Tue Nov 29, 2005 5:33 pm
- Location: Eastern Oregon
- Contact:
In photography this is called selective coloring. It began way back when, with black and whites that people colored with special inks. You've probably seen some old postcards, etc. with this technique.
Enough of the history lesson. This can be used to really make some areas stand out well, just don't go to overboard with it.
These look great!
Enough of the history lesson. This can be used to really make some areas stand out well, just don't go to overboard with it.
These look great!
in His grip, Chris
Feed my hobby? [url=http://www.bricklink.com/store.asp?p=wunztwice]My Bricklink[/url]
[url=http://www.flickr.com/photos/wunztwice]My Flickr![/url]
[url=http://www.brickshelf.com/gallery/wunztwice/]My Brickshelf
<><
Feed my hobby? [url=http://www.bricklink.com/store.asp?p=wunztwice]My Bricklink[/url]
[url=http://www.flickr.com/photos/wunztwice]My Flickr![/url]
[url=http://www.brickshelf.com/gallery/wunztwice/]My Brickshelf
<><
Thanks!
"Enough of the history lesson. This can be used to really make some areas stand out well, just don't go to overboard with it."
I'm sure I'll be guilty of that for a little while since I just figured out how to do it.
(I usually tend to over-do it when I learn a new trick. )
)
I tried reducing the saturation of the colored areas, and it looks quite nice.
Good history lesson, I do recall seeing some old photos being colored this way, and always love the way they look.
Thanks for giving the proper name of it, Chris.
~Amanda
"Enough of the history lesson. This can be used to really make some areas stand out well, just don't go to overboard with it."
I'm sure I'll be guilty of that for a little while since I just figured out how to do it.
(I usually tend to over-do it when I learn a new trick.
I tried reducing the saturation of the colored areas, and it looks quite nice.
Good history lesson, I do recall seeing some old photos being colored this way, and always love the way they look.
Thanks for giving the proper name of it, Chris.
~Amanda
[url=http://www.bricklink.com/store.asp?p=Lamanda]Bricks & Customs[/url]
[url=http://www.flickr.com/photos/lamanda2/]My Flickr[/url]
[url=http://www.flickr.com/photos/lamanda2/]My Flickr[/url]
-
eNiGMa

- Justiciar
- Posts: 1842
- Joined: Tue May 03, 2005 10:43 pm
- Location: Taylorsville, Utah
- Contact:
These are awesome! My favorite is the Forestman; for me, his drunkenness (?) is really put into effect with the selective coloring. I may have to play around with this technique sometime....
Nathan Cunningham
[url=http://sly-pig.blogspot.com]Blog[/url] | [url=https://www.facebook.com/nathan.cunningham.9]Facebook[/url] | [url=http://sly-pig.blogspot.com/p/blog-page.html]MOCs[/url]
[url=http://sly-pig.blogspot.com]Blog[/url] | [url=https://www.facebook.com/nathan.cunningham.9]Facebook[/url] | [url=http://sly-pig.blogspot.com/p/blog-page.html]MOCs[/url]
-
Peppermint Pig

- candied swine
- Posts: 630
- Joined: Sun Feb 26, 2006 12:42 pm
There's a potentially easier way to do this.
You can do a hue/saturation adjustment, and then switch from MASTER to one of the various color adjusters. Pick the color you like, say red, and go to every other slider and drop the saturation to nothing. Voile!!!
Another method for selection is to use the Select: Color Range tool, which has a threshold and paint dropper method of narrowing down on the color you want.