
Well, I was going to take a few pictures of how to make the shoulders on my custom armor piece for VisVires and then decided to just go ahead and make a bit of a tutorial to give you all a basic idea of how to make your own suits of armor.
I just uploaded the pictures, so it is not yet public. But for those of you who would like to view it now: (Deeplinks go from 001 to 014)
'Deeplink
And here is the gallery link for easy reference:
'Gallery
Please, if you have any questions/comments let me know. This is my first go at a guide so if there are any problems or if it's hard to follow let me know.
Thank you, and good luck if you give it a try!
~Amanda
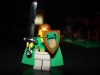
Tutorial- Custom Armor.

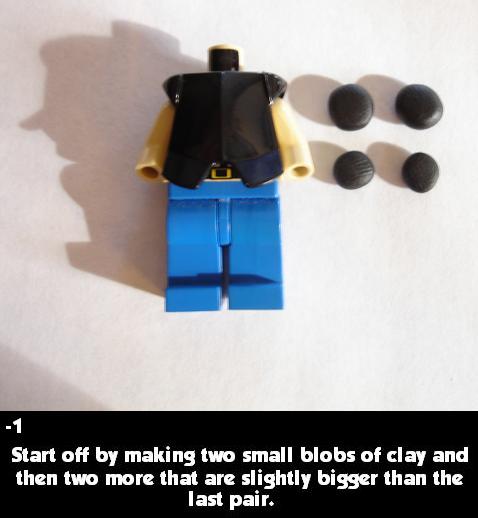
I usually leave the piece right on the minifig, if you don't want to get burned stick an extra pair or two of legs on it so that you can have your hand for ther away from the heat.
Don't just keep the heat directly on the piece, as this may cause the plastic to distort. just sway the blowdryer from side-to-side to prevent this.
when you think it might be fully cooked just lightly poke it, if it feels a bit mushy keep going, if it's hard then you can stop heating it. (Be sure to check if all of it is cooked. Sometimes I might miss the back or a shoulder.)
I just set it down on a table or something for a little while after that, and so far I've never had it break while it was sitting there.
~Amanda
-
Princess_C

- Freeman
- Posts: 87
- Joined: Sat Sep 09, 2006 3:24 am
Beautiful work, Amanda. I'm going to give that a try for a project I'm working on. Thanks for the tutorial
[url=http://www.flickr.com/photos/jedispring/]My Gallery[/url]
-
Lord Felix

- Landlord
- Posts: 912
- Joined: Wed Feb 22, 2006 2:07 am
- Location: Utah, USA Age: 27
Great tutorial. I personally don't use sculpy, but it is a great tutorial none the less.
[url=http://www.brickshelf.com/cgi-bin/gallery.cgi?m=Dandin]Brickshelf[/url]
[url=http://www.flickr.com/photos/8499398@N07/]Flickr[/url]
[url=http://www.myspace.com/candlemusic]My Band: Candle[/url]
[url=http://www.flickr.com/photos/8499398@N07/]Flickr[/url]
[url=http://www.myspace.com/candlemusic]My Band: Candle[/url]

Great tutorial Amanda, I think more and more people will be willing to try this since you made such clear step by step instructions.
[url=http://www.brickshelf.com/cgi-bin/gallery.cgi?m=RecluceMage]Custom cast helmets and hairpieces![/url]
[url=http://www.dabelbrothers.com/home.html][img]http://www.maj.com/gallery/RecluceMage/Pict ... banner.gif[/img][/url]
[url=http://www.dabelbrothers.com/home.html][img]http://www.maj.com/gallery/RecluceMage/Pict ... banner.gif[/img][/url]
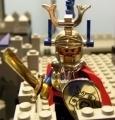
A great tutorial. Your finished piece was amazing!
[img]http://www.brickshelf.com/gallery/danielz/m ... uce1.2.jpg[/img]
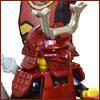
Awesome work on the armour, Amanda! And I just love that hammered effect you gave!
Just a word of advice (if I may) for everyone else; Amanda is really good and experienced with sculpey, so although the tutorial looks relatively simple to do, effort and practice would be required to replicate that. The first time round may not be as perfect, but do keep trying! I know I would.
Just a word of advice (if I may) for everyone else; Amanda is really good and experienced with sculpey, so although the tutorial looks relatively simple to do, effort and practice would be required to replicate that. The first time round may not be as perfect, but do keep trying! I know I would.
-
Fry_slayer

- Steward
- Posts: 539
- Joined: Sun Nov 21, 2004 11:52 am
- Location: was in Legoland
Clayver! 
Another way to recycle jelly armor.
Another way to recycle jelly armor.
[url=http://www.brickshelf.com/cgi-bin/gallery.cgi?m=Fryslayer]Brickshelf[/url] | [url=http://brickgamers.blogspot.com/]BrickGamers[/url]
Glad you all seem to be finding it useful!
Ziggy- Good luck!
Emily- Thank you, I am glad to hear that the steps come across clear. I was worried it would be too hard to follow.
"Just a word of advice (if I may) for everyone else; Amanda is really good and experienced with sculpey, so although the tutorial looks relatively simple to do, effort and practice would be required to replicate that. The first time round may not be as perfect, but do keep trying! I know I would."
Very good point, Nick.
It is true, it may be hard to do your first time(s). And I too advise you to keep practicing! I wasn't very good when I first started out, but with patience and practice I have gotten alot better at it. (And even now, I am still learning. )
Keep on customizing!
~Amanda
Ziggy- Good luck!
Emily- Thank you, I am glad to hear that the steps come across clear. I was worried it would be too hard to follow.
"Just a word of advice (if I may) for everyone else; Amanda is really good and experienced with sculpey, so although the tutorial looks relatively simple to do, effort and practice would be required to replicate that. The first time round may not be as perfect, but do keep trying! I know I would."
Very good point, Nick.
It is true, it may be hard to do your first time(s). And I too advise you to keep practicing! I wasn't very good when I first started out, but with patience and practice I have gotten alot better at it. (And even now, I am still learning.
Keep on customizing!
~Amanda
-
daggerblood

- Laborer
- Posts: 131
- Joined: Thu Nov 16, 2006 2:14 am
- Contact:
Thanks for this tutorial. The steps are easy to follow, I'm definitely going to try it out.
[url=http://nikolaus.xtronics.com]My website[/url]
~Nik
~Nik